Tuesday, October 11, 2011

Quesadillas

Back in the spring I got together to make dinner with my friend Anna.  She suggested that we make quesadillas and I brought over what I had in my fridge.  The result was something pretty similar to what follows.  It's such an easy weeknight meal and you can put whatever kind of toppings you want in it.  This is just how I usually make my quesadillas.

Here's what you'll need:

Ah, forgot to take a pic of all the ingredients together. Oh well.

  • 1 package of mushrooms
  • 1 pepper (I prefer red)
  • 1 onion (I prefer red, again)
  • 1 package chicken breast
  • cheddar cheese
  • tortillas (the bigger ones, I think they're burrito size)


Start by chopping up all your veggies.


My favorite things right there. :)


Chop up the chicken breasts into bite-sized pieces.


Have your very cute helper shred some cheddar cheese.


Eat some of the cheese, cause cheese is good. :)


Take artsy pictures of the grated cheese on your fancy paper plate.


Saute veggies in a hot pan with some olive oil. After a few minutes add chicken to pan.  Salt and pepper. 


Let chicken cook for a minute or two and then turn over to finish cooking.


When the chicken is fully cooked remove mixture from pan.  Feel free to do some taste testing.  Wipe out any excess liquid from pan and spray with some cooking oil.


Place a tortilla on a plate and fill halfway with chicken and veggie mixture.  Don't put too much in, or your quesadilla will overflow.


Top with grated cheese.


Add some salsa.  You could also add some sliced jalapenos.


Close up that bad boy.


And add to pan.  Cook for a few minutes and flip.  You want both sides to get nice and crispy.


Perfection.


Slice and serve with a dollop of sour cream.


And if you have some, I like to mix some Sriracha sauce in with my sour cream and use as a dipping sauce for my quesadillas.  I have been obsessed with this sauce.  You have to try it!  Enjoy!

Spaghetti & Meatballs

So I was planning on posting this recipe back in April, but I just wasn't a fan of the pictures.  Then I figured, oh well, I want people to have my meatball recipe, so here you go!

What you'll need:


  •  1 package of turkey burger.  Make sure you get the 93/7 pack and not the 99% fat free. I used that once and the meatballs were way too dry.
  • 1 egg
  • seasoned bread crumbs
  • Parmesan cheese
  • garlic powder
  • oregano
  • crushed red pepper
  • And of course some spaghetti and sauce to go with your delicious meatballs. We like the wheat spaghetti. And I have cheap sauce in this picture, but lately I've been obsessed with Bertolli, so that is what I would recommend. 

Throw your turkey burger in a nice big bowl.  Now here I didn't take any pictures, just because I didn't think they were pretty at all and I thought it was pretty self-explanatory.  Add breadcrumbs, egg, Parmesan cheese, garlic powder, oregano, and crushed red pepper.  Mix together with your hands.


When you're done you should have something like this.


Take a medium glass baking dish and a little olive oil to the bottom of the pan.


Form golf ball-sized meatballs and add to pan.  You can roll each around in the olive oil a bit.


Throw in 350 degree oven for 30 minutes.


And here's what they'll look like when they're done.


Now while you were making your meatballs, you should have also been cooking your spaghetti.  If you start warming a pot of water up around the time you start making your meatballs, the timing should work out where everything is done at the same time.


Top spaghetti with meatballs and sauce and enjoy!  I think this makes a great weeknight meal.

Now to the full recipe, which is going to be a tad difficult since I don't really measure anything when I make these.

Full Recipe

Ingredients:


  • ~1 pound package of ground turkey (93/7)
  • 1 egg
  • 1/2 cup seasoned bread crumbs
  • 1/4 cup grated Parmesan cheese
  • 1 tsp. garlic powder
  • 1/2 tsp. oregano
  • 1/2 tsp. crushed red pepper
  • 1 tbsp. olive oil
  • 1 package spaghetti
  • 1 jar spaghetti sauce

Preheat oven to 350 degrees.  Cook pasta as directed.  In a large bowl, combine turkey, egg, bread crumbs, Parmesan cheese, garlic powder, oregano, and crushed red pepper.  In a medium-sized glass baking dish, add olive oil.  Create golf ball-sized meatballs and add to dish, rolling in olive oil.  Bake for 30 minutes.  Serve with spaghetti and sauce.

Friday, September 30, 2011

Butternut Squash Soup

Growing up, we never ate anything that remotely had to do with butternut squash, so the first time I had the soup, I was a little bit skeptical.  It was so good, though.  Savory, sweet, and hearty.  The perfect soup for fall.  So I took my friend's recipe and tweaked it a bit.  For all my vegetarians, this is a vegetarian recipe.

Here's what you'll need:

  • 1 medium-large sized butternut squash
  • 1 medium onion
  • a few celery stalks
  • 2-3 carrots or about a cup of baby carrots
  • 3 cloves garlic, minced
  • 1 large carton of vegetable broth
  • coconut milk - you'll most likely find this in the aisle with the hispanic/international food
  • all spice
  • crushed red pepper


Dice up an onion.


Then chop up some carrots.


Then chop up some celery. I include the leafy bits because they add flavor and it's all going to get blended, anyway.  I usually just try to do equal portions of each veggie instead of measuring each out.  You can also just throw each of these in the food processor.  I've done this before, but then that's just another thing to wash, and I'm usually not feeling that.


Take a nice big pot and heat some olive oil to medium-high heat.  If you want, add a pad of butter, too. I was in that kind of mood. :)


Throw all your veggies in, along with your minced garlic.  Add some salt and pepper.  Let veggies cook until softened.


Now it's time to tackle the squash.  Butternut squash is considered a winter squash and winter squashes are some tough veggies.  They are a pain in the butt to peel and deal with in general.  Because of this, I will refer to my squash as THE BEAST from here on out.


So this is what THE BEAST looks like when you've managed to cut it in half.  Kinda looks like a pumpkin.


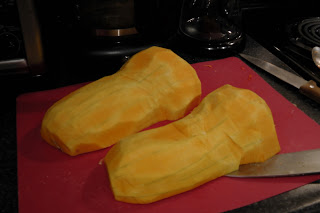
This is what THE BEAST looks like after you've peeled it.  I really can't offer any suggestions for peeling, because it is a struggle for me every time.  You will want to try your best not to touch the flesh of the squash so much, because it makes your hands very dry.  In fact, I read online that some people have an allergic reaction, so hopefully you're not one of those people. 


Scoop out the seeds and guts.


Then chop THE BEAST into cubes.  No need to be exact.  This is the easiest part of dealing with the squash.  But I was definitely sweating by the time I got to this part.


While you were dealing with THE BEAST, your veggies should be softened and a little brown, too. Yum.


Add the squash, along with the vegetable broth.  You want the broth to just about cover the squash.  If it doesn't, add some water.  I added about 1and 1/2 cups. Bring to a boil, reduce heat, cover and simmer until the squash is soft, approximately 30 minutes. 


Your mixture will now look something like this.  Not all that pretty.


Add your allspice and crushed red pepper.  I just sprinkled each, and I think I might have gone a little heavy on the crushed red.  Don't be like me.  You can always add more later.


Get your blender out and scoop your mixture into the blender.  Make sure it's a glass blender.  I don't think it would be good if it were plastic.  Puree until smooth.  It doesn't take too much blending since everything is already so soft.


I usually have to do this in batches, so take what you've blended and place in a bowl.  Once you've blended it all, return it all to your large pot.


Bring to a simmer and add coconut milk. Simmer for 10 minutes and add salt and pepper to taste.


Here's the finished product. I just love the color. It screams fall!


Serve with a hearty bread. I like getting a multi-grain baguette, cutting into pieces, and toasting in the oven. You can also have a nice glass of red wine, too.  Gorgeous!  And a great thing to make for a dinner party, too.  Enjoy!


Full recipe:

2 tbsp butter or Olive Oil1 medium onion, minced3 cloves garlic, minced
1 cup carrots, chopped
1 cup celery, chopped
1 medium-large sized butternut squash, peeled and cubed
1 large carton of vegetable broth1/2 Tsp allspice1/8 Tsp red pepper flakes (I use more because we like spice)12 ounces coconut milksalt and pepper to taste

In a large pot, saute until golden:  butter, onion, carrot, celery and garlic
Add butternut squash and vegetable broth.
Bring to a boil, reduce heat, cover and simmer until the squash is soft, approximately 30 minutes.  Add 1/2 cup water if needed.
Add allspice, and red pepper flakes.
Puree soup in blender.  Return to pan, bring to a simmer and add coconut milk.  Simmer 10 minutes, salt and pepper to taste.
  

Tuesday, July 19, 2011

Falafel

So for those of you not familiar with falafel, it is a deep fried ball or patty made from ground chickpeas.  I've had it at restaurants and it's a great vegetarian wrap.  I had never made falafel and never really thought to make it, until I ran across this recipe on Pinterest.  It just sounded so interesting to me to cook falafel, something typically crispy and deep fried, in a Crock Pot.  Usually I just cook a roast or chicken in the crock pot. Oh! Except the one day I got fancy and made Crock Pot risotto. I'll have to do that again and post it on here.

So here is what you'll need to make your falafel:
  • 1 15oz can garbanzo beans
  • 1/2 onion, chopped
  • 1 Tbsp. dried parsley
  • 2 cloves minced garlic (I bought the jarred minced kind and don't regret it one bit!)
  • 1 egg
  • 1/2 tsp. kosher salt
  • 1/4 tsp. black pepper
  • 2 tsp. ground cumin
  • 1 tsp. ground coriander
  • 1/4 tsp. cayenne pepper
  • juice from 1 lemon (I just gave about a 4 second squirt from the bottle of lemon juice I have.) 
  • 3/4 cup bread crumbs (I used seasoned breadcrumbs, but you can use whatever you have) 
  • 2-4 Tbsp. olive oil


First, start by draining the garbanzo beans and placing them in a large bowl. Then smash the beans with a fork or another utensil. The fork works surprisingly well.


Then, start by chopping up a small onion, or half of a large onion. You don't need to be too precise since this is going in the food processor.


Dump the chopped onion into the food processor.  Start adding your spices.  These pictures were very hard to take, so bare with me, and with my horribly cheap measuring spoons.

Start with the parsley.


Then add the cumin.  The cumin really makes this dish.  Spices like this are so expensive at the grocery store, so if you are on a budget like me, check out drug stores or dollar stores. Their spices are a lot cheaper.


And speaking of cheap spices, I got this coriander cheap from Ollie's, and it's organic. Woot!


I got frustrated at this point with the camera. So add the coriander, cayenne, salt, pepper, garlic, lemon juice, and egg to the mixture. Then pulse til everything is mixed like so:


Add this wet mixture to the mashed chickpeas and combine.


Slowly add in the breadcrumbs until the mixture is dry enough to form into balls.


Form golf-ball sized balls and set aside.  Add olive oil to the Crock Pot. Dip each ball into the olive oil and then nestle into your Crock Pot. It's okay if they overlap or are on top of each other.


Cook on high for 3-5 hours, with the top on. Mine cooked for about 4 hours.  I kept checking on them and was very doubtful that they were going to get crispy, but they did! You can give them a turn about half-way through, but I really don't think it's necessary. I think I actually made more of a mess doing that. 


So while you're waiting for your falafel to cook in the Crock Pot, you can make a tzatziki sauce to go with.  It's just a simple cucumber yogurt dressing. It's easy to make, but I wouldn't recommend making as much as I did, because then you'll have so much you won't know what to do with it.

But here's what I did. Peel a cucumber, cut in half lengthwise and deseed (is that word?) it with a spoon. 


Then give it a good chopping. Again, this is going in the food processor, so don't get fancy.


You're going to need some plain yogurt. I think next time I'll try greek yogurt. I think it would make the sauce a little thicker.


Add the yougrt and cucumber to the food processor. Then add about 3 cloves of minced garlic, salt, pepper, and a few squirts of lemon juice.  Puree and then place in the fridge until you're ready to use it.  The longer it sits in the fridge the better.


And here is what the falafel looks like when it is done. I really was shocked by how dark and crispy they were, just from being in the Crock Pot.  You can serve these with Pita bread, but I just used whole wheat tortillas.


Add some lettuce, tomato, and your tzatziki sauce and you're good to go. The falafel is rather spicy, so the toppings really help to cool the spice down.


So you'd think that's the end of this post, but you'd be wrong.

I was really curious, what the benefits of cooking in the Crock Pot versus just pan frying were. I mean, I wouldn't have time to make this in the Crock Pot during the week. So the next night I made the same recipe, except I cooked the falafel in a pan (I still didn't want to mess with deep-frying).  It was just like frying up some meatballs.


They still got nice and brown on the outside, although I would have to say that the Crock Pot really got every inch of the falafel crispy.


Once in the wrap, it pretty much tasted the same.  I think that the Crock Pot falafel holds up better, but it's easier for me and much quicker to make it in a pan.


Go try making it yourself and tell me what you think!